The fence does not work. There is no electricity in the fence. There is no shock from the fence. The shock is weak. The electric fence does not work in winter. Sounds familiar?
Determination of electric fence condition requires a systematic approach. This way, you can find out where the actual problem lies: In the energiser or in the fence – or perhaps between them.
Determination of electric fence condition
If there is a problem with the fence in terms of electricity flow, you should first carry out the traditional sensory checks:
- Is the energiser power on? Does it seem to function?
- Does the fence look intact? If you can see from afar that the animals are busy enjoying the crops on your neighbour’s field, half of the fence is missing and the rest in obviously bad shape, this can be rather widely related with the problems.
- Are the gates closed? (This must be considered if the fence has been built without passages underneath the gate; in other words, if the fence section following the gate is not energised if the gate is open.)
- Is it summer and the soil terribly dry?
- Has the grass grown tall enough to reach the fence?
- Is it winter and the ground covered in snow and ice?
Absolutely, the time of year does matter: If the fence has not been built in accordance with winter fencing instructions, weaker fence performance because of the insulating snow, ice and frost can be expected. The same applies to parched soil.
These problems caused by winter (or draught) can be corrected either with a properly assembled two-wire fence or by using winter fence tape (and using it the right way). For the related instructions, read the Olli Winter Fencing Guide. Tips on resolution of problems in case of a fence built using winter fence tape are also available in our article “Building fences with winter fence tape – utter agony or straightforward bliss?”. In summer, problems caused by drought can also be resolved using winter fencing methods. However, watering of the earthing system could bring the quickest relief.
To determine the electric fence condition otherwise than visually or manually, you need a fence tester. Two different fence testers are available from Olli, Digitester+ and Supertester+. With a fence tester, you can test the energiser’s functionality and measure the fence voltage.
Now, it is time to examine the fence systematically:
- First, test if the energiser works
- Check the connector cable between the fence and the energiser
- Check earthing
- Check the fence itself: Fence conductors, connections and insulators
1. First, test if the energiser works
If the fence seems to function poorly, always test the energiser first. This way, you can avoid circling the entire fence and checking each fence conductor (in other words, fence wire, rope or tape), insulator and connection only to find out that the energiser is dead.
This is how to test energiser operation
- Disconnect power supply to the energiser. Disconnect the energiser from the fence and earthing. Reconnect power supply to the energiser.
- Using a fence tester, measure the voltage between the energiser’s shock terminal and earthing terminal. Set the tester’s measuring sensor to the energiser’s shock terminal and the earthing rod to the earthing terminal. If the voltage is close to the “maximum voltage, Umax” value specified by the manufacturer, the energiser is in order.
If the fence energiser functions flawlessly, proceed with checking the flow of electricity a) to the fence and b) in the fence.
2. Check the connector cable between the fence and the energiser
Or, first of all, check that there is a connector cable between the energiser and the fence, and that it has not become detached from the a) energiser or b) fence. Also, check that the connector cable from the earthing rod is connected to the energiser’s earthing terminal.
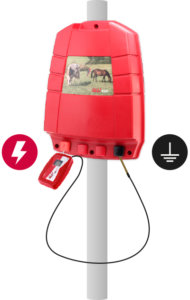
This is how to connect connector cables to the energiser
- Press down the button of the energiser’s terminal.
- Carefully insert the cable (do not force the cable in, as this could break the connector inside the terminal).
- Release the button to connect the cable to the energiser’s terminal.
In case of screw-fastened versions, see that the connection has not loosened or the fence connector cable become detached from the energiser.
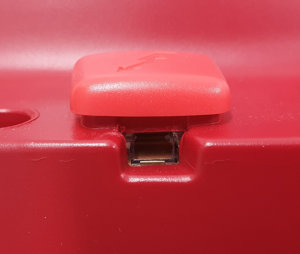

Terminals of Olli energiser, screw-fastened version
This is how to measure voltage from the fence connector cable
- Disconnect the fence connector cable end facing the fence.
- Insert the earthing rod into the ground.
- Touch the fence connector cable end facing the fence with the fence tester’s measuring sensor.
If the voltage reading is significantly lower than that measured from the energiser, the problem lies in the fence connector cable or earthing – or in both.
There can be many reasons for a poorly functioning fence connection: Perhaps something altogether different has been used instead of the fence connector cable supplied with the energiser. For example, a length of fence conductor with a couple of knots is never good news.
If, however, the fence is so far away from the energiser that the fence connector cable supplied with the energiser is not long enough and the power is supplied to the energiser over an underground (or aerial) cable, make sure the cable used for this is a high-voltage cable intended for energiser-related use, which is capable of withstanding even the 10,000V+ voltages generated by the energiser. Ordinary electrical installation cables have been designed to withstand only the 230V supply from a wall outlet, which is way less than 10,000 volts.
An ordinary electrical installation cable used with an energiser is like a leaking water hose: Electricity can escape from it, leading to steep voltage drop. And we do not want this, for if the voltage drops before it even reaches the fence, the fence cannot give a proper shock. Low voltage = weak shock. If the cable used is of the wrong kind, it must be replaced – alas, there is no other option. Whatever the case, if the root cause of the problem is the fence connector cable, replace it and measure again.
After this, you can be sure of that both the energiser and the connector cable between the energiser and the fence are in order. Next, let’s turn our gaze to the ground.
3. Check earthing
Inadequate or improper earthing is the most common cause of poor fence efficiency (and interference with radio equipment). Even if you are sick and tired by now of the subject of earthing, there is no escape from it, because earthing plays a crucial role in the operation of an electric fence.
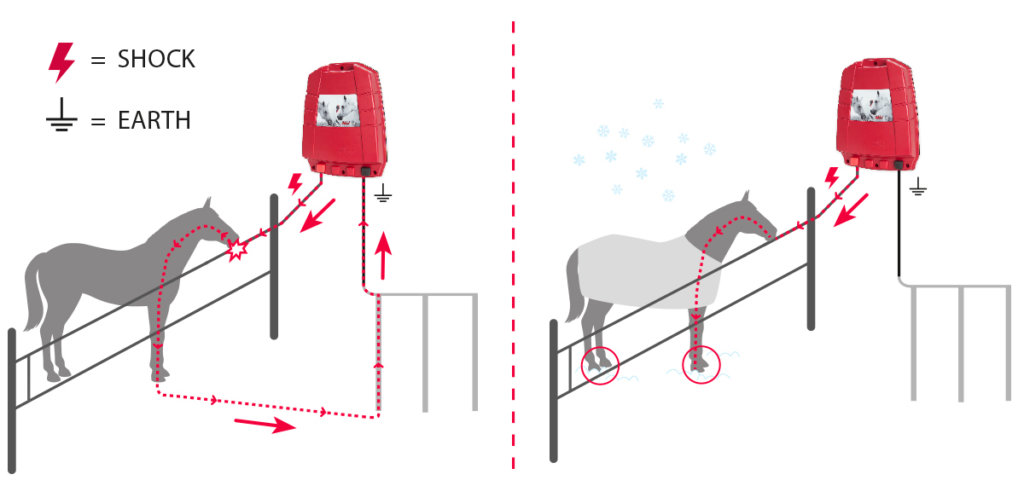
The operating principle of an electric fence is as follows:
When an animal touches the electrified fence, electricity passes from the fence through the animal into the ground, through the ground to the earthing rods, and through them back to the energiser, giving the animal a shock on the way.
If the electrical path between the animal and the ground is interrupted for some reason, the animal will not receive a shock, even if the energiser functions properly.
Therefore, there will be no shock when the animal touches the electrified fence, but only when the electricity returns to the energiser.
Common causes for inadequate earthing:
- insufficient quantity of earthing rods with consideration of the energiser power and fence size
- incorrect placement of earthing rods; for example, under eaves in dry macadam (which is a poor conductor)
- dry, rocky or stony soil (being also poor conductors)
- areas adjacent the fence are paved in asphalt/concrete/rock or other poorly conductive material
- earthing rods are not buried deep enough
- wrong earthing rod material (for example, rebars subject to corrosion that impairs conductivity)
- poor connections along the cable connecting the earthing rods to the energiser.
Earthing rods, which cost only some 10 euros apiece, are hardly the right choice for cutting costs. The rule of thumb here is “better safe than sorry”.
If the fence is located in an area where the ground conductivity is poor (for example, the soil is dry, rocky, or paved), a fence built in accordance with winter fencing instructions, with a separate return path for electricity to the energiser, is a functional solution in summer as well.
Fixing earthing by following these instructions will often eliminate many problems related to weak fence impulses.
Earthing rod installation
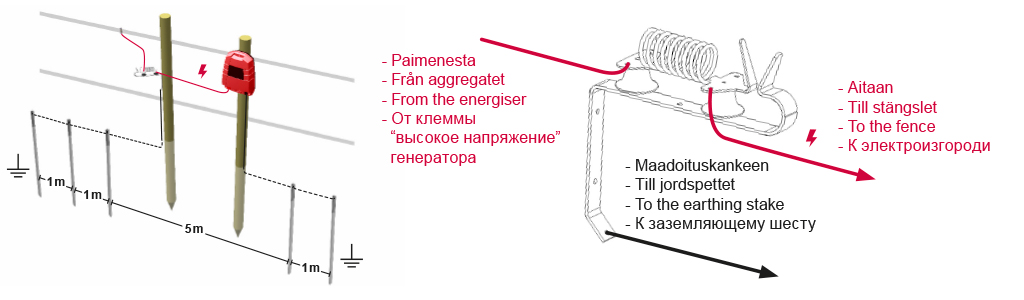
Adequate earthing of the fence energiser requires a sufficient number of earthing rods. Depending on the length of the fence and the power of the energiser, 1-6 earthing rods are usually needed. In dry conditions and in case of long fences, even more earthing rods may be required. There cannot be too many earthing rods; it is better to have some extra than too few.
Bury the earthing rods completely underground, at a distance of at least 1m from each other. No earthing rod may remain visible; all of them must be completely buried under the ground. The best place for an earthing rod is moist soil or clay – for example, a ditch bank. If the soil is quite dry, regular watering of the earthing location improves earthing.
The current in the electric fence flows from the energiser to the fence conductors and from the fence through the soil to the earthing rods and from there back to the energiser. To prevent interference caused by the current flowing in the ground, the earthing rods should be placed so that there are no structures between the fence and the earthing rods. If necessary, the earthing rods can be installed at a distance from the energiser using a high voltage cable.
The diameter of the earthing conductor must be at least 1mm and it must always be connected to the earthing rods by screw joints to ensure adequate contact. Olli earthing rods are supplied with a 3m earthing conductor and mounting screws.
The earthing rods must be placed to the distance of at least 10 metres from other earthed systems, such as electricity networks or water mains. As these are commonly found in residential buildings and farm facilities, the safety distance should be measured away from the building’s plinth, avoiding wells and power supply and telecommunications system lines. An especially bad idea is to connect fence earthing by a cable to the protective earth of the electricity system. A lightning conductor intended for protection of other systems is also not to be applied for energiser earthing purposes.
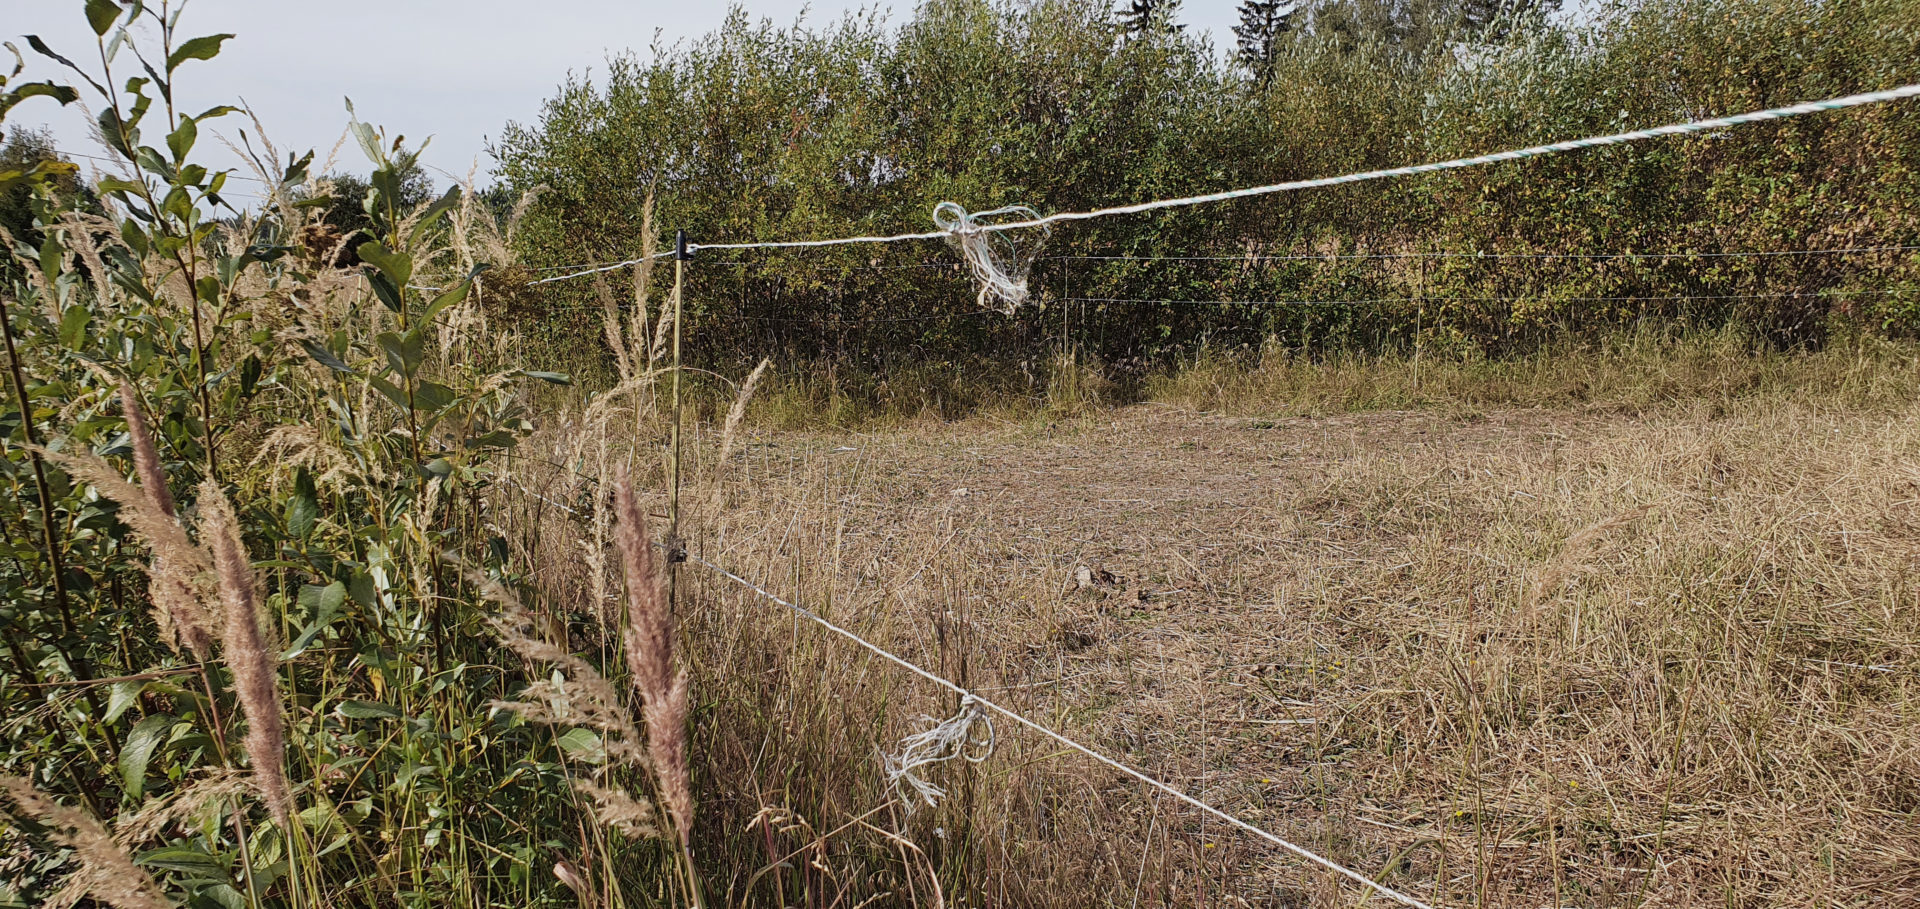
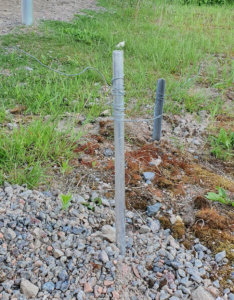
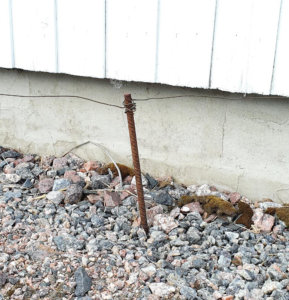
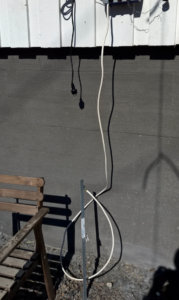
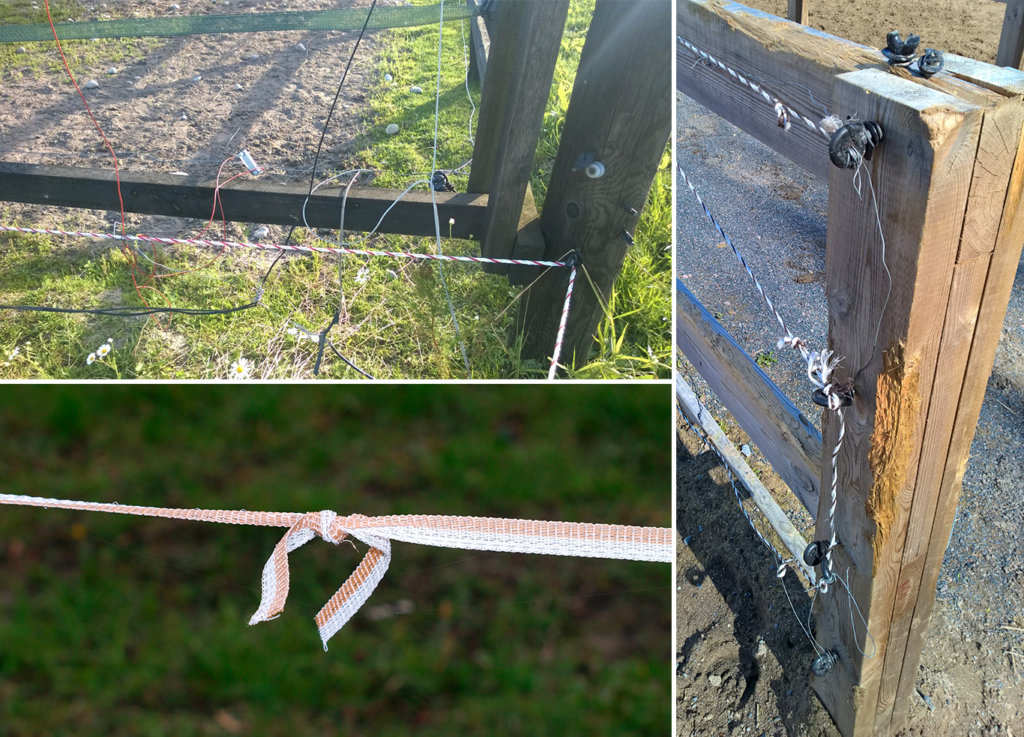
If your earthing resembles the works of art in the photos below, corrective measures are required immediately:
Note! If you equip your fence with a separate lightning protector, keep in mind that it requires its own earthing rods (at least 3 pcs.).
4. Check the fence itself: Fence conductors, connections and insulators
The same energiser often protects several gardens, and pastures may be involved as well. In this case, you should inspect the fence circuit by circuit. For example, if you disconnect a pasture circuit from the fence and the problem goes away, you will know that the problem is in that particular circuit.
Fence voltage measurement by fence tester
- Push the fence tester’s earthing rod into the ground.
- Touch the fence with the tester’s measuring sensor. The meter shows the voltage in your fence.
- Test each fence wire strand separately.
- In case of winter fence tape, test the voltage between the shock voltage and earthing wire bundles.

If fence voltage is poor, a more detailed examination of the fence should be carried out. And as we stated earlier, the condition of an electric fence should be examined systematically. Therefore, systematically go through the entire fence, checking the condition of fence conductors, connections, and insulators. For example, if the fence conductor is in contact with a metal post at a single location along the fence, the fence voltage (and the resulting shock) may drop substantially.
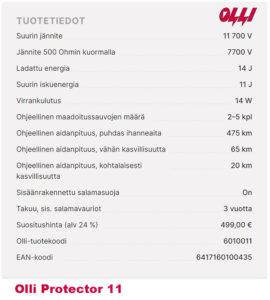
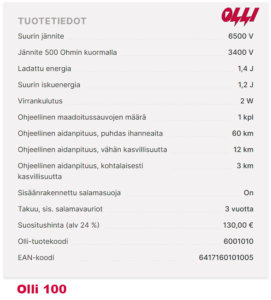
In addition, note that the capacity of your energiser must initially be sufficient with consideration of the fence size. Energiser manufacturers specify a reference range of fence lengths for which an energiser is recommended. In the same connection, the effect of vegetation on the fence length is specified: The greater the share of vegetation capable of reaching the fence, the shorter the fence an energiser can efficiently energise. If the energiser is too weak with consideration of the fence size and fencing conditions, one cannot expect the fence to deliver a decent shock.
And now, pay attention: When calculating the fence length, all fence wire strands must be added up. In other words, if you have a one hundred metres long fence consisting of three fence wire strands, the actual length of your fence is 300 metres.
You should keep in mind that the values provided are indeed indicative, since it is impossible for the energiser manufacturer to know precisely the actual fence to be connected to the unit: What is the actual length of the fence, what kind of fence conductors have been used, how many fence wire strands are there, what connections, extensions and insulators are being used, and so on. However, based on the values, it can be decided with sufficient accuracy whether the energiser’s power is at least approximately suitable for your needs.
Fence conductors
In order to understand the importance of the role of fence conductors, i.e., fence wires, ropes or tapes, in electric fence operation, you should pay a closer look on how electricity flows in the fence.
The fence energiser generates a fence pulse less frequently the once a second. In case of a high-power energiser, the pulse is longer than that of a low-power one, but for reasons of safety, the pulse is always very short, typically lasting less than a thousandth of a second. In this short time, electricity must make it even to the farthest corner of the fence.
Electricity travels at approximately the speed of light, so this does not pose a problem, but the conductivity (resistivity) of fence conductors, the number of conductors and the length of the fence greatly affect the heights that the voltage level reaches during the pulse at different points of the fence. In addition, vegetation in contact with fence conductors and dirty or moist insulators leak current from the fence conductor to the earthing.
Therefore, the purpose of the fence conductor is to conduct electricity from the energiser to the farthest corner of the fence. Even if there are no vegetation or insulator-related leaks, the fence always induces a load for the energiser. The longer is the fence and the greater the quantity of fence wire strands, the higher the load. For this reason alone, a long fence requires a more powerful energiser.
Nevertheless, a more powerful energiser is of no use at all if the fence conductor does not fulfil its function, i.e., conduct electricity well enough. Therefore, fence conductors with low resistivity should be used in a long fence. Otherwise, the conductor will slow down the voltage rise at the farthest point of the fence to such extent that the voltage fails to reach a sufficiently high level during the short pulse. Replacing your energiser with a more powerful unit will extend the pulse and can thus help a little, but in most cases not even closely enough.
For a better idea, imagine that a high-performance energiser is a water bucket from which water is splashed to a drain (i.e., fence conductor) at every pulse.
If the drain is a municipal grade water main pipe (that is, a steel fence conductor), all of the water splashed will happily flow away, but if the drain is a drinking straw (the cheapest fence conductor purchased from a discount store), the water splashed is mostly spilled and only the amount passing through the straw reaches the fence.
When dripping water from a drinking glass (that is, a smaller energiser), the straw will do its job – that is, if the fence is short.
If the fence conductors and the energiser correspond to the length of the fence, you need to consider the vegetation likely to reach the fence and how meticulously it will be mowed. The energiser needs to maintain a sufficient voltage in the fence even in rain. The more vegetation there is, the more powerful energiser is required. A fence conductor with improved conductivity (i.e. low resistivity) supports the energiser in this respect as well.
Fence conductors not only of poor quality, but also of poor condition impair fence functionality. Even though high-quality fence wires, ropes and tapes intended for year-round use last long, they do not last forever: A time when they must be replaced will inevitably come. Over the years, dirt, moss and other vegetation accumulate on the fence conductors and metal conductors (i.e., the very conductors of electricity) breaking over time impair the flow of electricity in the fence. Moreover, if fence extensions and connections have been made carelessly, for example, using knots, in which the metal conductors of the fence conductor are not in proper contact and generate sparks, it is difficult for the electricity to flow smoothly in the fence.
In addition, fence conductors require tensioning over time: Temperature fluctuations, snow and ice accumulating on the fence conductors, animals colliding with the fence, etc. lead to stretching of the fence conductor over time. Hanging wires can contact each other and generate sparks or cause a voltage drop when touching a metal post, for example.
Connections and extensions
Fence conductor connections and extensions must also be made so that interference with the flow of electricity is prevented. In practice, this means that the better the thin metal wires contained in the fence conductor touch each other on both sides of the connection/extension, the better the electricity flows. On the other hand, every poor connection impairs the flow of electricity, and the effect is multiplied if there are many poor connections.
The most convenient way for making connections is by using metal fence connectors, since they conduct electricity well – and over their entire surface. Moreover, need-based tensioning of fence conductors using openable connectors is considerably easier as compared to making a series of closed knots.
Insulators
As the name suggests, the function of an insulator is to insulate the passage of electricity from a fence conductor to somewhere it does not belong – for example, a fence post. An insulator in poor shape performs this function poorly. For example, perhaps the insulator is broken – or originally of poor quality, unsuitable for Finland’s demanding weather conditions, for example, susceptible to frost damage, and/or provided with an insulating plastic layer insufficient from the very start.
For example, if the plastic part of an insulator wears out, the metal inside the insulator can be exposed, allowing electricity to escape. Thus, electricity can leak through insulators broken or of poor quality, which once again leads to voltage drop (and the related weakening of the shock). Even though we know from school physics that dry wood does not conduct electricity, wet wood does. And it does rain sometimes.
Replace any fence conductors, connectors and insulators of poor condition or quality, measure the fence voltage, and repeat this process until you find the cause of voltage drop and your fence once again works as it is supposed to.
P.S. Do not fall into despair even if you should fail to identify the problem causing the voltage drop in the fence at a first glance. Determination of electric fence condition sometimes requires patience. In some cases, the single broken insulator being the culprit in contact between the fence conductor and a metal post and leading to voltage drop in the entire fence can be really difficult to find. Nevertheless, you will find it eventually.