The earthing is of key importance for the operation of an electric fence. Inadequate or incorrect earthing is the most common cause of poor fence efficiency. By compliant and functional installation of the earthing in accordance with the instructions, you can often eliminate many problems related to poor fence efficiency.

So why then is earthing so often a problem? A very common cause of non-functioning earthing is certainly that the fence builder has not understood the importance of the role of earthing in the operation of the electric fence. In other words, there is a lack of knowledge about the operation of the electric fence and where the shock comes from. Without realising the importance of the matter, they will then stick any metal rod in the ground because "they were told to install an earthing rod". And that is not a good solution at all.
Why is proper earthing so important to the operation of an electric fence?
- An animal touching the electrified fence receives a shock when the electricity passes from the fence through the animal into the ground, through the ground to the earthing rods, and through the earthing rods back to the energiser.
- If electricity cannot return to the energiser, there will be no shock.
- Therefore, earthing rods are tasked with providing a return path for the electricity from the soil to the energiser.
- The more reliable is this path, the more likely is the fence to deliver a shock. Adding earthing rods and improving earthing conditions will make it easier for electricity to reach the energiser and may greatly improve the functionality of the fence.
The clever ones have already identified the reason why a conventional fence does not work in winter: when snow, ice and frost act as insulators, the electricity cannot travel from the animal's feet through the insulating layer of snow to the ground and back to the energiser as smoothly as it can when the ground is not frozen. Therefore, in winter, the fence will have either a weaker shock or no shock at all - unless the fence is constructed according to winter fencing instructions, either with a two-wire technology or with a winter fence tape, i.e. an alternative return path for the electricity to the energiser).
Common causes for inadequate, poorly functioning earthing:
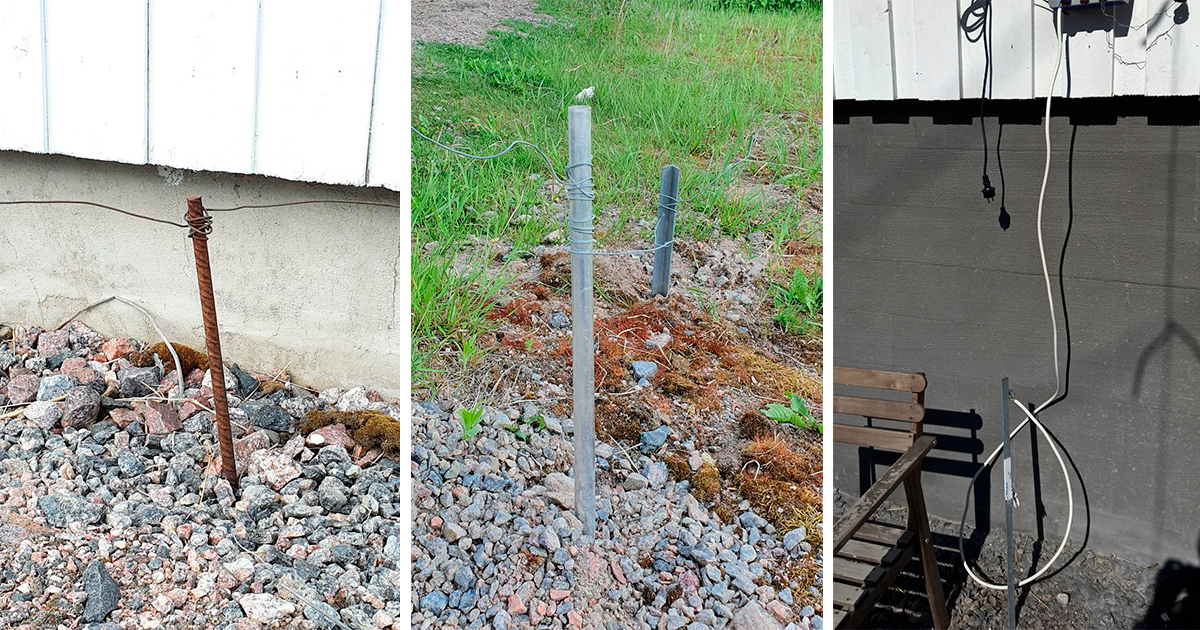
1. Incorrect placement of earthing rods; for example, in dry macadam under the eaves of a building.
- Dry earth is a poor conductor. Dry areas located under the eaves and covered in macadam are a good solution for the building, but a poor choice in terms of electrical conductivity. In addition, the earthing rods should be placed to the distance of at least 10 metres from residential and farm buildings, as generally other earthed systems, such as sections of electricity networks or water mains are found in such buildings.
2. Dry, rocky or stony soil or soil areas adjacent to the fence are paved in asphalt, or of concrete, rock or other poorly conductive material.
- Besides dry land, rock, asphalt, and concrete conduct electricity poorly. Wetting the dry land temporarily improves the contact between the earthing rods and the ground, but for permanently dry conditions, we recommend building the fence in accordance with the winter fencing instructions, with a separate return path for electricity to the energiser, in the two-wire fence configuration or using winter fence tape.
- If there is no suitably moist area for earthing near the energiser, the earthing rods can also be placed away from the energiser. In addition, earthing rods may be located in several places. We recommend using Olli High Voltage Cable designed for energiser use for connecting remote earthing fields to the energiser.
3. Earthing rods not buried deep enough.
- If an earthing rod is not buried completely under the soil, some of its capacity will remain unused. In general, the deeper you dig, the moister the soil, and for this reason as well the earthing rods should be covered in ground over their entire length. Last but not least, there is the risk of stumbling over earthing rods sticking out of the ground and getting injured.
4. Incorrect earthing rod material (for example, one subject to corrosion).
- Rebars or other corroding materials constitute a poor choice for earthing rods, as rust insulates and prevents the flow of electricity. To prevent rusting, Olli earthing rods are hot-dip galvanised.
5. Poor connections along the cable connecting the earthing rods to the energiser.
- Poor connections can prevent the return of electricity from the earthing to the energiser. In such cases, there will be no shock. Use screw connections to ensure sufficient contact
6. Insufficient quantity of earthing rods in relation to the energiser power and fence size.
- The more powerful the energiser and the longer the fence, the greater can be the energy passing through the fence and earthing. In case of fence conductors or earthing incapable of conducting higher currents, a more powerful energiser cannot be used to its full benefit.
- Electrical conductivity of the earthing can be improved by enlarging the size of the earthing field – in other words, by increasing the number and/or quality of earthing rods.
Did you receive an electric shock from an earthing rod?
If this is the case, there is clearly room for improvement in the earthing.
- In a standard fence, the current from an energiser flows from the energiser fence terminal to the fence wires and from there to the soil in various ways (e.g. when the animal touches the fence or along the vegetation as a current leakage). On the ground, the current flows to the earthing rod and from there to the earthing terminal of the energiser.
- If the earthing rod is poor or inadequate (for example, if the underground parts are completely corroded), the electricity will not flow properly from the ground to the earthing rod. In this case, if you touch the ground and the end of the earthing rod or the earthing wire of the energiser at the same time, you have just turned yourself into another earthing rod. Not a very strong one, but no wonder if you feel a pulse in your fingers...
Earthing rod installation
Adequate earthing of the fence energiser requires a sufficient number of earthing rods. Depending on the length of the fence and the power of the energiser, 1-6 earthing rods are usually needed. In dry conditions (i.e. if the ground is a poor conductor of electricity) and in case of long fences, even more earthing rods may be required. The recommended number of earthing rods for each energiser can be found both on the energiser sales pack and here on Olli's website under each energiser in question.
Better safe than sorry: There cannot be too many earthing rods; better have some extra than too few.
- Bury the earthing rods completely under ground, at a distance of at least 1m from each other. No earthing rod may remain visible; all of them must be completely buried under the ground. In this case, the entire length of the rod is put to use.
- The best place for an earthing rod is moist soil or loam – for example, a ditch bank. If the soil is completely dry, regular watering of the earthing location improves earthing contact with the ground.
- For permanently dry or rocky conditions, we recommend building the fence in accordance with the winter fencing instructions, with a separate return path for electricity to the energiser, in the two-wire fence configuration or using winter fence tape.
- The diameter of the earthing wire must be at least 1mm and it must always be connected to the earthing rods by screw joints to ensure adequate contact. Hot-dip galvanized Olli earthing rods are supplied with a 3m connection wire and mounting screws. If the length of this earthing wire is insufficient, we recommend using Olli High Voltage Cable designed for energiser use.
- Note that if you equip your fence with a separate lightning protector for the fence energiser, it requires its own earthing rods in addition to the earthing rods of the energiser. The number of earthing rods for the lightning protector should exceed that of the energiser (at least 3 pcs.). The rods are to be installed at a distance of approx. 1m from each other and approx. 5m from the energiser’s earthing rod.
Do not place the earthing rod in the wrong places
As we already know now, the current in the electric fence flows from the energiser to the fence conductors, passes into the soil through the animal touching the fence, runs through the soil to the earthing rods and from there through earthing wire back to the energiser. It is also important to know where you should never put an earthing rod:
- To prevent interference caused by the current flowing in the ground, the earthing rods should be placed so that there are no structures between the fence and the earthing rods. If necessary, the earthing rods can be installed at a distance from the energiser using a high voltage cable.
- The earthing rods must be placed to the distance of at least 10 metres from other earthed systems, such as electricity networks or water mains. As these are commonly found in residential buildings and farm facilities, the safety distance should be measured away from the building’s plinth, avoiding wells and power supply and telecommunications system lines. After all, you don't want a) to receive an electric shock in the shower or b) that animals receive an electric shock by their drinking water dispensers.
- An especially bad idea is to connect fence earthing by a wire to the protective earth of the electricity system, as it causes interferences in electrical and telecommunications equipment. A lightning conductor intended for protection of other systems is also not to be applied for energiser earthing purposes.
The fence is still not working?
Now that earthing is in order, there are still problems with the fence? For detailed instructions on how to determine the condition of the fence, see the Determination of electric fence condition article.
Also check out Olli's fencing guides. You will find lots of information, advice and tips on how to create functional fences and winter fences.